1. Overview
In this article, we will learn about building a bridge in an application that needs to be spring enabled.
2. Why develop a bridge?
Let us understand this using an example.
For instance, let’s say you have a web application with request dispatcher. The request is served by the request dispatcher by calling the specified method of implementation. You cannot change the request dispatcher as it is provided by the web framework that you currently use.
Let us define the problem statement. If we want to use the spring framework functionality like dependency injection, exception handling, etc we need to make our application aware of ApplicationContext.
“ApplicationContext is a central interface that provides configuration to the application. ApplicationContext itself represents the Spring IOC container and is responsible for instantiating, configuring and assembling the aforementioned beans. This information is provided to ApplicationContext using configuration metadata i.e., XML config or Annotation based config.”
https://docs.spring.io/spring/docs/3.2.x/spring-framework-reference/html/beans.html#beans-basics
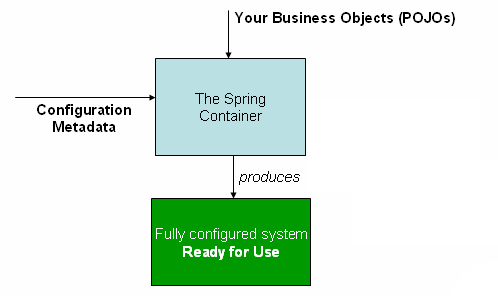
Image reference : https://docs.spring.io/spring/docs/3.2.x/spring-framework-reference/html/beans.html
3. ApplicationContextAware Interface
I believe the name ApplicationContextAware is really good. Just by reading the name you can guess that it has to make ApplicationContext aware to someone.
Alright so what is this interface and why do we need it? Well, our use-case is that we need to have a bridge between a request dispatcher and spring managed beans. If we have a bridge then we can access the fancy spring stuff else not. The interface ApplicationContextAware will act like a bridge to us.
ApplicationContextAware has one abstract method.
void setApplicationContext(ApplicationContext applicationContext)
	throws BeansException;
public class ApplicationContextProvider
						implements ApplicationContextAware {

	private ApplicationContext applicationContext = null;

	@Override
	public void setApplicationContext(
						ApplicationContext applicationContext)
						throws BeansException {

		this.applicationContext = applicationContext;

	}
}
The above code compiles but still the ApplicationContext will not be set, hence it would be null. Now if we mark our class with annotation @Component or @Named the ApplicationContext will be loaded properly. The class that implements ApplicationContextAware must be managed by IOC Container/ApplicationContext itself. The bean that implements ApplicationContextAware is deployed in ApplicationContext itself and it will be called back upon creation of the bean using setApplicationContext(ApplicationContext ac) method. When method setApplicationContext(ApplicationContext ac) is called the beans are already generated and placed in ApplicationContext.
Let’s complete our ApplicationContextProvider class.
@Named
public class ApplicationContextProvider
						implements ApplicationContextAware {

	private ApplicationContext applicationContext = null;

	private static final ApplicationContextProvider INSTANCE
						= new ApplicationContextProvider();

	@Override
	public void setApplicationContext(
						ApplicationContext applicationContext)
						throws BeansException {

		this.applicationContext = applicationContext;

	}

	@Bean
	public static ApplicationContextProvider getInstance() {
		return INSTANCE;
	}

	public <T> T getBean(Class<T> clazz) {
		return applicationContext.getBean(clazz);
	}

}
The above code is fully functional code that bridges the part of of non spring and spring components together.
Let’s talk about getBean method for a minute. It returns the object of the class. Once this object is returned your bridge is set and this class is not useful afterwards. Do not pass ApplicationContext around and do not use getBean method again. getBean method returns the object that is already managed by ApplicationContext which means you are now in spring context and you can use spring features.
4. Conclusion
In this article, we learned how to create a bridge in application that needs to be spring enabled.