If you want to watch the video for this blog. Click here.
1. Overview
In this article I will discuss a validator pattern which will use dependency injection of Spring Boot. I will also define an interface, concrete class and exception wiring mechanism. Lastly I will describe how to write a unit test case for this validators. No mocks or mokito is used in this article.
This is going to be fun article as I love dependency injection.
One thing to note here is I have used field injection. But please use constructor injection while injecting dependencies.
2. Defining Validator interface.
Before we start writing any validator related code we need to define an interface. Why do we need interface, you may ask? Well, because we can specify uniform input to the Validator class and uniform output of error.
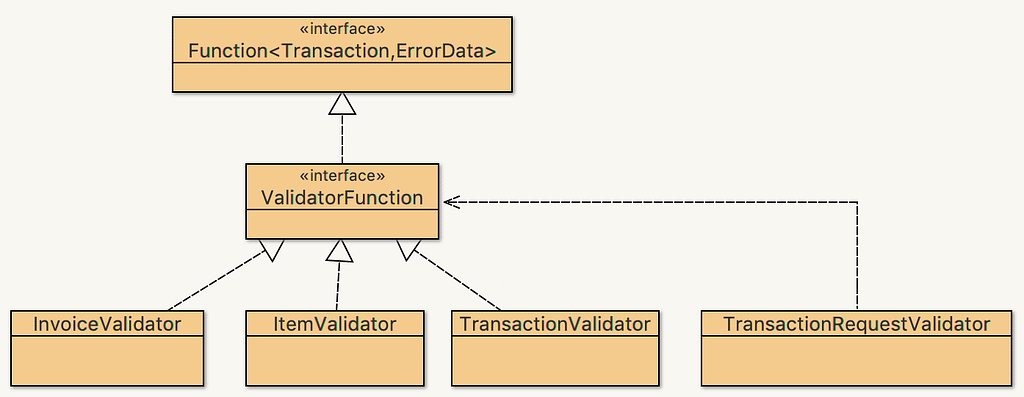
Let’s call our validator interface as ValidatorFunction. Our ValidatorFunction will work very much like java.util.Function<T, R>. Function<T, R> interface accepts input type T and returns output type R. Let us just extend the Function<T, R> interface in our ValidatorFunction interface.
@FunctionalInterface
public interface ValidatorFunction<T, R> extends Function<T, R> {

}
ValidatorFunction interface is Functional Interface as it extends Functional Interface and doesn’t add any additional abstract methods.
Type T is our input request object let’s say the object is of type Transaction.
Type R is List<ErrorData>. It signifies different ErrorData’s coming out of different validators.
Rewriting the ValidatorFunction.
@FunctionalInterface
public interface ValidatorFunction extends
						Function<Transaction, List<ErrorData>> {

}
Better, eh?
3. Deciding on ErrorData.
ErrorData class looks like this.
public final class ErrorData {

    private final String message;
    private List<String> errorArgs;

    private ErrorData(String message, List<String> errorArgs) {
        this.message = message;
        this.errorArgs = Collections.unmodifiableList(errorArgs);
    }

    public static ErrorData of(String message, String... errorArgs){
        return new ErrorData(message, Arrays.asList(errorArgs));
    }

    public String message() {
        return message;
    }

    public List<String> errorArgs() {
        return errorArgs;
    }
}
Let us assume that validator kicks in and founds something is not right, then it needs to report the issue using List<ErrorData>. We are not going to create this List<ErrorData> on the fly. We will make sure that ApplicationContext has this List<ErrorData> in it so we can just use dependency injection and get that result out. No need to create List and manually add this ErrorData into it.
First, create a ValidatorErrorBeans class and annotate it with @Configuration.
@Configuration
public class ValidatorErrorBeans {

}
@Configuration indicates that class declares one or more @Beans methods and may be processed by Spring Container to generate bean definitions and service requests for those beans at runtime.
When you annotate a class with @Configuration, the class is candidate for auto-detection when using annotation-based configuration and classpath scanning. Remember, the package of class must be in @ComponentScan(“package name”). Once this class is scanned this methods are executed and the result is stored in ApplicationContext. Let us make this class shiny.
@Configuration
public class ValidatorErrorBeans {

    @Bean
    public List<ErrorData> noInvoice() {
        return Collections.singletonList(
                ErrorData.of("Invoice is empty", "invoice"));
    }

    @Bean
    public List<ErrorData> noItems() {
        return Collections.singletonList(
                ErrorData.of("Items is empty", "items"));
    }

    @Bean
    public List<ErrorData> noAmount() {
        return Collections.singletonList(
                ErrorData.of("Amount not specified", "amount"));
    }

    @Bean
    public List<ErrorData> noTransaction() {
        return Collections.singletonList(
                ErrorData.of("Transaction not specified",
							"transaction"));
    }

}
Alright, now we have List<ErrorData> in place which we can reuse using injection. No need to create them on the fly.
4. Writing actual Validators
Writing actual validator has 3 different steps.
Step 1 : Implement ValidatorFunction interface and annotate class with @Named. @Named works same as @Component.
@Named
public class TransactionValidator implements ValidatorFunction {

    @Override
    public List<ErrorData> apply(Transaction transaction) {

    }

}
Step 2 : Inject required beans from ValidatorErrorBeans. Do not inject configuration class directly. It is considered as anti-pattern. Your code should be decoupled from configuration code. Just inject required beans.
@Named
public class TransactionValidator implements ValidatorFunction {

    @Inject
    private List<Error> noTransaction;

    @Override
    public List<ErrorData> apply(Transaction transaction) {

    }

}
Step 3 : Implement validator.
@Named
public class TransactionValidator implements ValidatorFunction {

	@Inject
	private List<Error> noTransaction;

	@Override
	public List<ErrorData> apply(Transaction transaction) {
		return transaction == null
				? noTransaction
				: Collections.emptyList();
    }

}
Simple enough, right?
5. Let’s write Invoice validator.
@Named
public class InvoiceValidator implements ValidatorFunction {

	@Inject
	private List<Error> noInvoice;

	@Inject
	private List<Error> noAmount;

	@Override
	public List<ErrorData> apply(Transaction transaction) {
		if (transaction != null && transaction.invoice() == null) {
			return noInvoice;
		}
		if (transaction != null
			&& transaction.invoice() != null
			&& transaction.invoice().invoiceTotal() == null) {
			return noAmount;
		}
		return Collections.emptyList();
	}

}
6. Now let’s us write ItemValidator
@Named
public class ItemValidator implements ValidatorFunction {

	@Inject
	private List<ErrorData> noAmount;

	private static final Predicate<Invoice> ITEM_PREDICATE =
		invoice ->
			!(invoice.items() == null
			|| invoice.items().isEmpty());

	@Override
	public List<ErrorData> apply(Transaction transaction) {
		if (transaction != null
			&& transaction.invoice() != null
			&& INVOICE_ITEM_PREDICATE.test(transaction.invoice())) {
			return transaction
						.invoice()
						.items()
						.stream()
						.map(Item::price)
						.filter(Objects::isNull)
						.findAny()
						.map(money -> noAmount)
						.orElseGet(Collections::emptyList);
		}
		return Collections.emptyList();
	}

}
7. Wiring all validators
We still need to define a common mechanism by which we can wire all the validators together.
We still need to define a common mechanism by which we can wire all the validators together.
Below is how we can wire all validators using dependency injection. We just need to use @Inject annotation on List<ValidatorFunction> and it is taken care of.
@Inject
private List<ValidatorFunction> validatorFunctions;
Let’s make this better.
@Named
public class TransactionRequestValidator {

    @Inject
    private List<ValidatorFunction> validatorFunctions;

    public void validate(Transaction transaction) {
    }

}
Now all we need to do is iterate the validatorFunctions and pass transaction to ValidatorFunction’s apply method.
@Named
public class TransactionRequestValidator {

    @Inject
    private List<ValidatorFunction> validatorFunctions;

    public void validate(Transaction transaction) {
        List<ErrorData> errorDatas =
		validatorFunctions
			.stream()
			.map(validatorFunc -> validatorFunc.apply(transaction))
			.flatMap(Collection::stream)
			.collect(Collectors.collectingAndThen(
						Collectors.toList(),
						Collections::unmodifiableList));

		if (!errorDatas.isEmpty()) {
			throw new RequestValidationException(errorDatas);
		}
	}

}
And that’s it on writing validators using Dependency Injection in Spring Boot. Let us now move on to writing unit tests.
8. Unit tests
Step 1. As we have used dependency injection we need to make sure that unit tests also use dependency injection.
In order to do that we need to create a TestConfig class that does package scan to so as it can add all the objects in ApplicationContext.
@Configuration
@ComponentScan(basePackages = "package name")
public class TestConfig {

}
Step 2. Add required annotations to test class.
@RunWith(SpringJUnit4ClassRunner.class)
@ContextConfiguration(classes = { TestConfig.class })
public class TransactionTest {

}
Step 3. Inject the main validator.
@RunWith(SpringJUnit4ClassRunner.class)
@ContextConfiguration(classes = { TestConfig.class })
public class TransactionTest {

    @Inject
    private TransactionRequestValidator transactionReqValidator;

}
Step 4. Writing tests.
@RunWith(SpringJUnit4ClassRunner.class)
@ContextConfiguration(classes = { TestConfig.class })
public class TransactionTest {

	@Inject
	private TransactionRequestValidator transactionReqValidator;

	@Test
	public void testNullTransaction() {
		try {
			Transaction txn = null;
			transactionReqValidator.validate(txn);
			// If below line is executed means validator didn't
			// throw an exception. It must throw an exception
			Assert.fail();
		} catch (RequestValidationException ex) {
			// If exception is thrown means validator threw
			// exception which is expected output.
			Assert.assertTrue(true);
        	}
	}

	@Test
	public void testNullInvoice() {
		try {
			// Invoice is null
			Transaction txn = Transaction.of(customer, merchant, null);
			transactionReqValidator.validate(txn);
			// If below line is executed means validator didn't
			// throw an exception. It must throw an exception
			Assert.fail();
		} catch (RequestValidationException ex) {
			// If exception is thrown means validator threw
			// exception which is expected output.
			Assert.assertTrue(true);
		}
	}

}
9. Conclusion
In this article, we saw how we can write validators using dependency injection using spring boot. We also saw how to write unit tests using dependency injection. Remember if you have xml file based approach for injection you can specify @ContextConfiguration(locations = “classpath:spring-test.xml”) in TestConfig class. You can provide both @ContextConfiguration and @ComponentScan too in TestConfig class.